Twelve Days of RACK 2019!
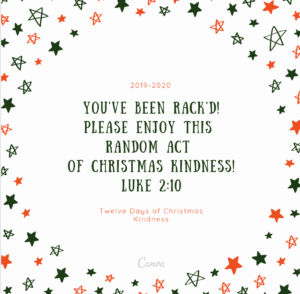 Celebrating the Twelve Days of Christmas with Random Acts of Christmas Kindness is one of my very favorite Palmer holiday traditions. It’s such a fun way to give back after we’ve been blessed at Christmas–to remember what Christmas is about… Continue reading
Advent Calendar 2017
I was recently invited to speak at a My Intentional Home workshop about how creating family traditions at the holidays helps to focus our families on the true meaning of Christmas, as well as reducing the stress we all tend… Continue reading
Breaking Bread with Brook Burke-Charvet
When we moved over the summer, one of the decisions we made as a family was to eliminate DirectTV. Netflix, Amazon Prime, and stations like MeTV are plenty to keep us entertained, and we have better control over what media… Continue reading
Twelve Days of Christmas 2013
Time for our third annual celebration of the Twelve Days of Christmas! Each year, I come up with 12 RACKs (Random Acts of Christmas Kindness) for the kids to do starting on the day after Christmas. Each day,… Continue reading
Christmas Countdown!
 I’m so excited to share our Christmas Countdown for 2013! A few years ago, I decided to help my kiddos focus more on family and giving rather than on Santa Claus. I love Christmas movies & the anticipation… Continue reading
 Find Me


 Find Me